Common Reasons for Emirates ID Photo Rejection: Complete Guide to Fix It and Get Approved
Being turned in on your application as Emirates ID due to a photo may appear as a minor setback; however, in the real sense, it can make your whole residency procedure drag on. Most applicants are under the assumption that they can post any clear picture. It’s not. Today, we’ll discuss Common Reasons for Emirates ID Photo Rejection.
The Emirates ID system has a high level of biometric and identity verification. Provided that your photo does not match those standards verbatim, your application will either be denied or held in suspension.
This guide will discuss the reasons why the Emirates ID photos are rejected, how to fix the situation correctly, and how to prevent the repetition of time wastage.
Why Emirates ID Photo Requirements Are So Strict? – Common Reasons for Emirates ID Photo Rejection
The Emirates ID is not simply a simple identification card. It is linked to:
- Residency status
- Immigration records
- Biometric identity systems
- Government and banking services
Due to this, the photo should be compatible with the facial recognition systems rather than human verification. Automated systems can be interfered with by even minor mistakes, such as lighting or angle.
This is the reason why the rules are very strict and always followed.
Most Common Reasons for Emirates ID Photo Rejection
The first point to remedy rejection is to understand the precise cause of rejection, and you should know the Most Common Reasons for Emirates ID Photo Rejection.
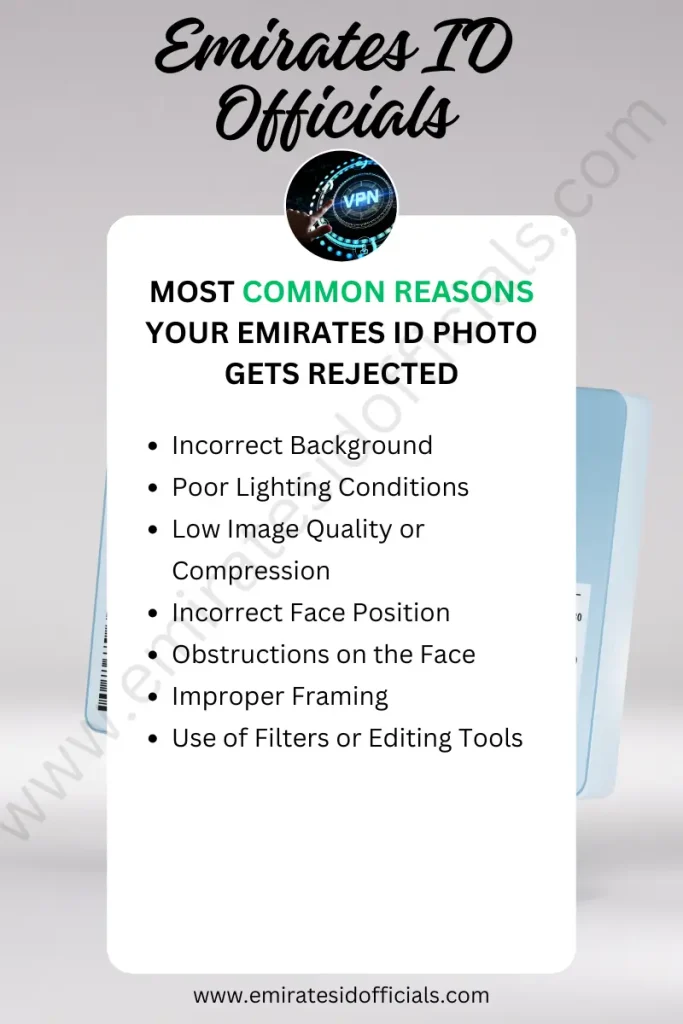
1. Incorrect Background
The background must be:
- Pure white
- Free from shadows
- Plain and consistent
The system will reject your background in case it is off-white, grey or textured. Soft shadows behind the head can also lead to a problem of biometric detection.
2. Poor Lighting Conditions
One of the most Common Reasons for Emirates ID Photo Rejection is poor lighting conditions. Lighting is significant in terms of acceptance.
Common mistakes include:
- Uneven lighting on the face
- Shadows across one side
- Overexposed (too bright) images
- Underexposed (too dark) photos
Your front must be well illuminated with no glare or shadow.
3. Low Image Quality or Compression
A good number of applicants post compressed pictures without their knowledge.
This happens when:
- Photos are sent via messaging apps like WhatsApp
- Screenshots are used instead of original images
- Images are edited multiple times
The outcome is decreased clarity, and the systems struggle to recognize the face features.
4. Incorrect Face Position
Another Common Reasons for Emirates ID Photo Rejection is the incorrect position of the face. Your face must follow strict positioning rules:
- Looking straight at the camera
- Head not tilted
- Eyes open and clearly visible
- Neutral expression
A simple angle or tilt might be rejected since this will interfere with the alignment of facial recognition.
5. Obstructions on the Face
Your face must be fully visible.
Photos may be rejected if:
- Hair covers part of your face
- Sunglasses are worn
- Heavy shadows hide features
Head coverings will be permitted, but the entire face has to be exposed above the forehead to the chin.
6. Improper Framing
Another Common Reasons for Emirates ID Photo Rejection is improper framing of the picture. The photo should be sufficiently framed.
Common framing issues:
- Face too far from the camera
- Head cropped or partially cut
- Too much empty space around the subject
A clear and central space of the image should be taken by your face.
7. Use of Filters or Editing Tools
Rejection can be occasioned by even slight modifications.
Avoid:
- Beauty filters
- Skin smoothing
- Color adjustments
These modifications modify the facial features and disrupt the biometric systems. If you’ve applied for the Emirates ID, you can check your status at Emirates ID Status.
How to Fix a Rejected Emirates ID Photo
In case of rejection of your photo, there is no complex solution; however, it should be done properly.
Step 1: Use a Plain White Background
Stand against a clean white wall. Make sure there are:
- No shadows
- No patterns
- No objects in the background
Daylight is best for the achievement of clean results.
Step 2: Ensure Proper Lighting
Position yourself facing a light source.
Best setup:
- Light coming from the front
- No strong light behind you
- No shadows on your face
Flash should not be used directly because it may cause glare.
Step 3: Capture a High-Quality Image
Have a good camera- most smartphones in the market will work.
Important points:
- Use the original camera (not third-party apps)
- Avoid screenshots
- Do not compress the image
Keep the original file quality intact.
Step 4: Maintain Correct Posture and Expression
Follow these rules:
- Look straight into the camera
- Keep your head level
- Maintain a neutral expression
- Keep both eyes open and visible
This ensures the system can correctly map your facial features.
Step 5: Avoid Editing the Photo
Upload the photo as it is.
Do not:
- Apply filters
- Adjust brightness excessively
- Retouch the image
Aspects of authenticity are preferable to appearance.
Applying from Outside the UAE: A Hidden Challenge
There are numerous problems that applicants outside the UAE encounter during their application, such as:
- Upload errors
- Portal timeouts
- Submission failures
These issues tend to be associated with network limitations or poor connections when using the official websites of the UAE government.
In order to decrease these complications and preserve a stable connection at the time of submission, some users use secure applications, such as Free VPN Planet, using official portals abroad.
What to Do If Your Photo Keeps Getting Rejected
If your photo is rejected more than once, do not keep guessing.
Instead:
- Visit an authorized typing center
- Use professional photo services familiar with UAE requirements
- Request a biometric-compliant image
These centers understand the exact specifications and can save you time.
Key Tips to Avoid Future Rejection
To ensure your photo gets approved on the first attempt:
- Always use a plain white background
- Ensure even lighting across your face
- Upload high-resolution images only
- Keep your face centered and clearly visible
- Avoid any editing or filters
- Double-check requirements before submission
Following these steps reduces the risk of rejection significantly.
When Will Your Application Be Approved After Fixing the Photo?
After uploading a photo that is corrected:
- The processing is normally restored in the range of 24 to 72 hours.
- In other instances, it can be executed up to 5 working days.
In the event that you do not have any other problems, your application will proceed without further delays.
FAQs
Final Thoughts
Rejection of the photo on the Emirates ID is not a huge issue- but when the reasons are not known, then the issue is serious.
The majority of the rejections occur because of mere errors: bad lighting, inappropriate background, or poor quality of pictures. The next thing is to rectify these, and then it is smooth sailing.
The key is precision. The system is tough since it is based on the accuracy of the biometrics and not appearances.
Get the fundamentals right the first time, and follow the rules and regulations, and everything on your application will proceed smoothly without needless hustle. Most of the Common Reasons for Emirates ID photo rejection have been discussed already, and now, by following this simple guide, you can fix your issues easily.
About Author
Sheikh Faisal is a Legal Services Consultant residing in UAE since 2018. He’s providing services related to Emirates ID, Emirates Visa, and other Emirates Services. He’s sharing his knowledge to benefit people seeking Emirates ID and other information.